# ポケモン図鑑を作ってみよう!
# 概要
- ポケモンの情報を返すGraphQLサーバがあるのでそれを叩くクライアントを作ってみます
# ゴール
- Playgroundでドキュメントを見ながらApolloClientを構築できるようになる
# ポケモンAPIのセッティング
- リポジトリをクローン
- gitコマンドが使えない人は以下URLから緑色の
Clone or downloadを押してDownload ZIPからZIPをダウンロードしてください - https://github.com/ozaki25/graphql-pokemon
- gitコマンドが使えない人は以下URLから緑色の
git clone https://github.com/ozaki25/graphql-pokemon.git
cd graphql-pokemon
1
2
2
- 依存ライブラリのインストール
yarn install
1
- 起動します
- http://localhost:4000で起動します
yarn watch
1
- http://localhost:4000にアクセスしてPlaygroundが表示されればOKです
- Docを見たりQueryを実行したりしてみましょう
- 実行できるQueryは
pokemonsとpokemonの2つです
# Reactアプリのセットアップ
- Reactアプリの雛形作成します
npm i -g create-react-app
create-react-app pokemon-client-sample
cd pokemon-client-sample
1
2
3
2
3
- ApolloClientとGraphQLのライブラリを追加します
yarn add @apollo/client graphql
1
- ReactRouterを追加します
- 今回はページ遷移のあるアプリを作ります
yarn add react-router-dom
1
- 以下のコマンドで起動することを確認しておきます
yarn start
1
- http://localhost:3000にアクセスしてReactのアイコンが回ってる画面が出ればOKです
# ApolloClientのセットアップ
src/graphql/client.jsを作成して以下の内容を記述してください- urlには先程起動したポケモンAPIのURLを書いておきます
import { ApolloClient, HttpLink, InMemoryCache } from '@apollo/client';

export default new ApolloClient({
  cache: new InMemoryCache(),
  link: new HttpLink({
    uri: 'http://localhost:4000/graphql',
  }),
});
1
2
3
4
5
6
7
8
2
3
4
5
6
7
8
src/App.jsに設定を反映させます
import React from 'react';
import { ApolloProvider } from '@apollo/client';

import client from './graphql/client';

function App() {
  return (
    <ApolloProvider client={client}>
      <h1>Hello</h1>
    </ApolloProvider>
  );
}

export default App;
1
2
3
4
5
6
7
8
9
10
11
12
13
14
2
3
4
5
6
7
8
9
10
11
12
13
14
# ReactRouterのセットアップ
- ページ遷移するための設定を追加します
- 先にサンプル用のコンポーネントを作っておきます
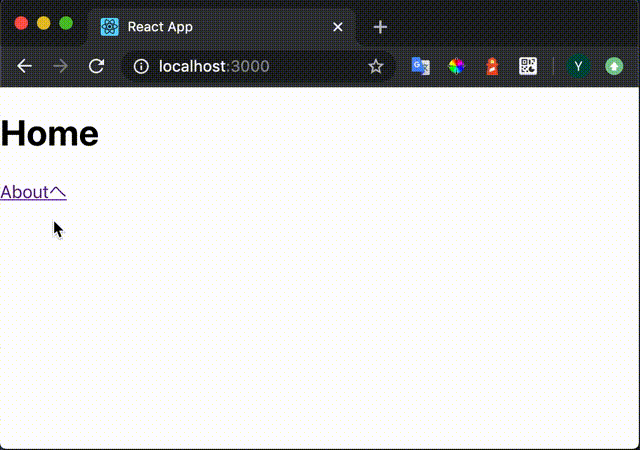
src/components/Home.js
import React from 'react';
import { Link } from 'react-router-dom';

function Home() {
  return (
    <div>
      <h1>Home</h1>
      <Link to="/about">Aboutへ</Link>
    </div>
  );
}

export default Home;
1
2
3
4
5
6
7
8
9
10
11
12
13
2
3
4
5
6
7
8
9
10
11
12
13
src/components/About.js
import React from 'react';
import { Link } from 'react-router-dom';

function About() {
  return (
    <div>
      <h1>About</h1>
      <Link to="/">Homeへ</Link>
    </div>
  );
}

export default About;
1
2
3
4
5
6
7
8
9
10
11
12
13
2
3
4
5
6
7
8
9
10
11
12
13
src/routes/router.jsを作成して以下の内容を記述してください
import React from 'react';
import { BrowserRouter, Route } from 'react-router-dom';
import Home from '../components/Home';
import About from '../components/About';

function Router() {
  return (
    <BrowserRouter>
      <div>
        <Route path="/" exact>
          <Home />
        </Route>
        <Route path="/about" exact>
          <About />
        </Route>
      </div>
    </BrowserRouter>
  );
}

export default Router;
1
2
3
4
5
6
7
8
9
10
11
12
13
14
15
16
17
18
19
20
21
2
3
4
5
6
7
8
9
10
11
12
13
14
15
16
17
18
19
20
21
src/App.jsにroutingの設定を反映します
import React from 'react';
import { ApolloProvider } from '@apollo/client';

import client from './graphql/client';
import Router from './routes/router';

function App() {
  return (
    <ApolloProvider client={client}>
      <Router />
    </ApolloProvider>
  );
}

export default App;
1
2
3
4
5
6
7
8
9
10
11
12
13
14
15
2
3
4
5
6
7
8
9
10
11
12
13
14
15
- ページ遷移できるようになっていればOKです
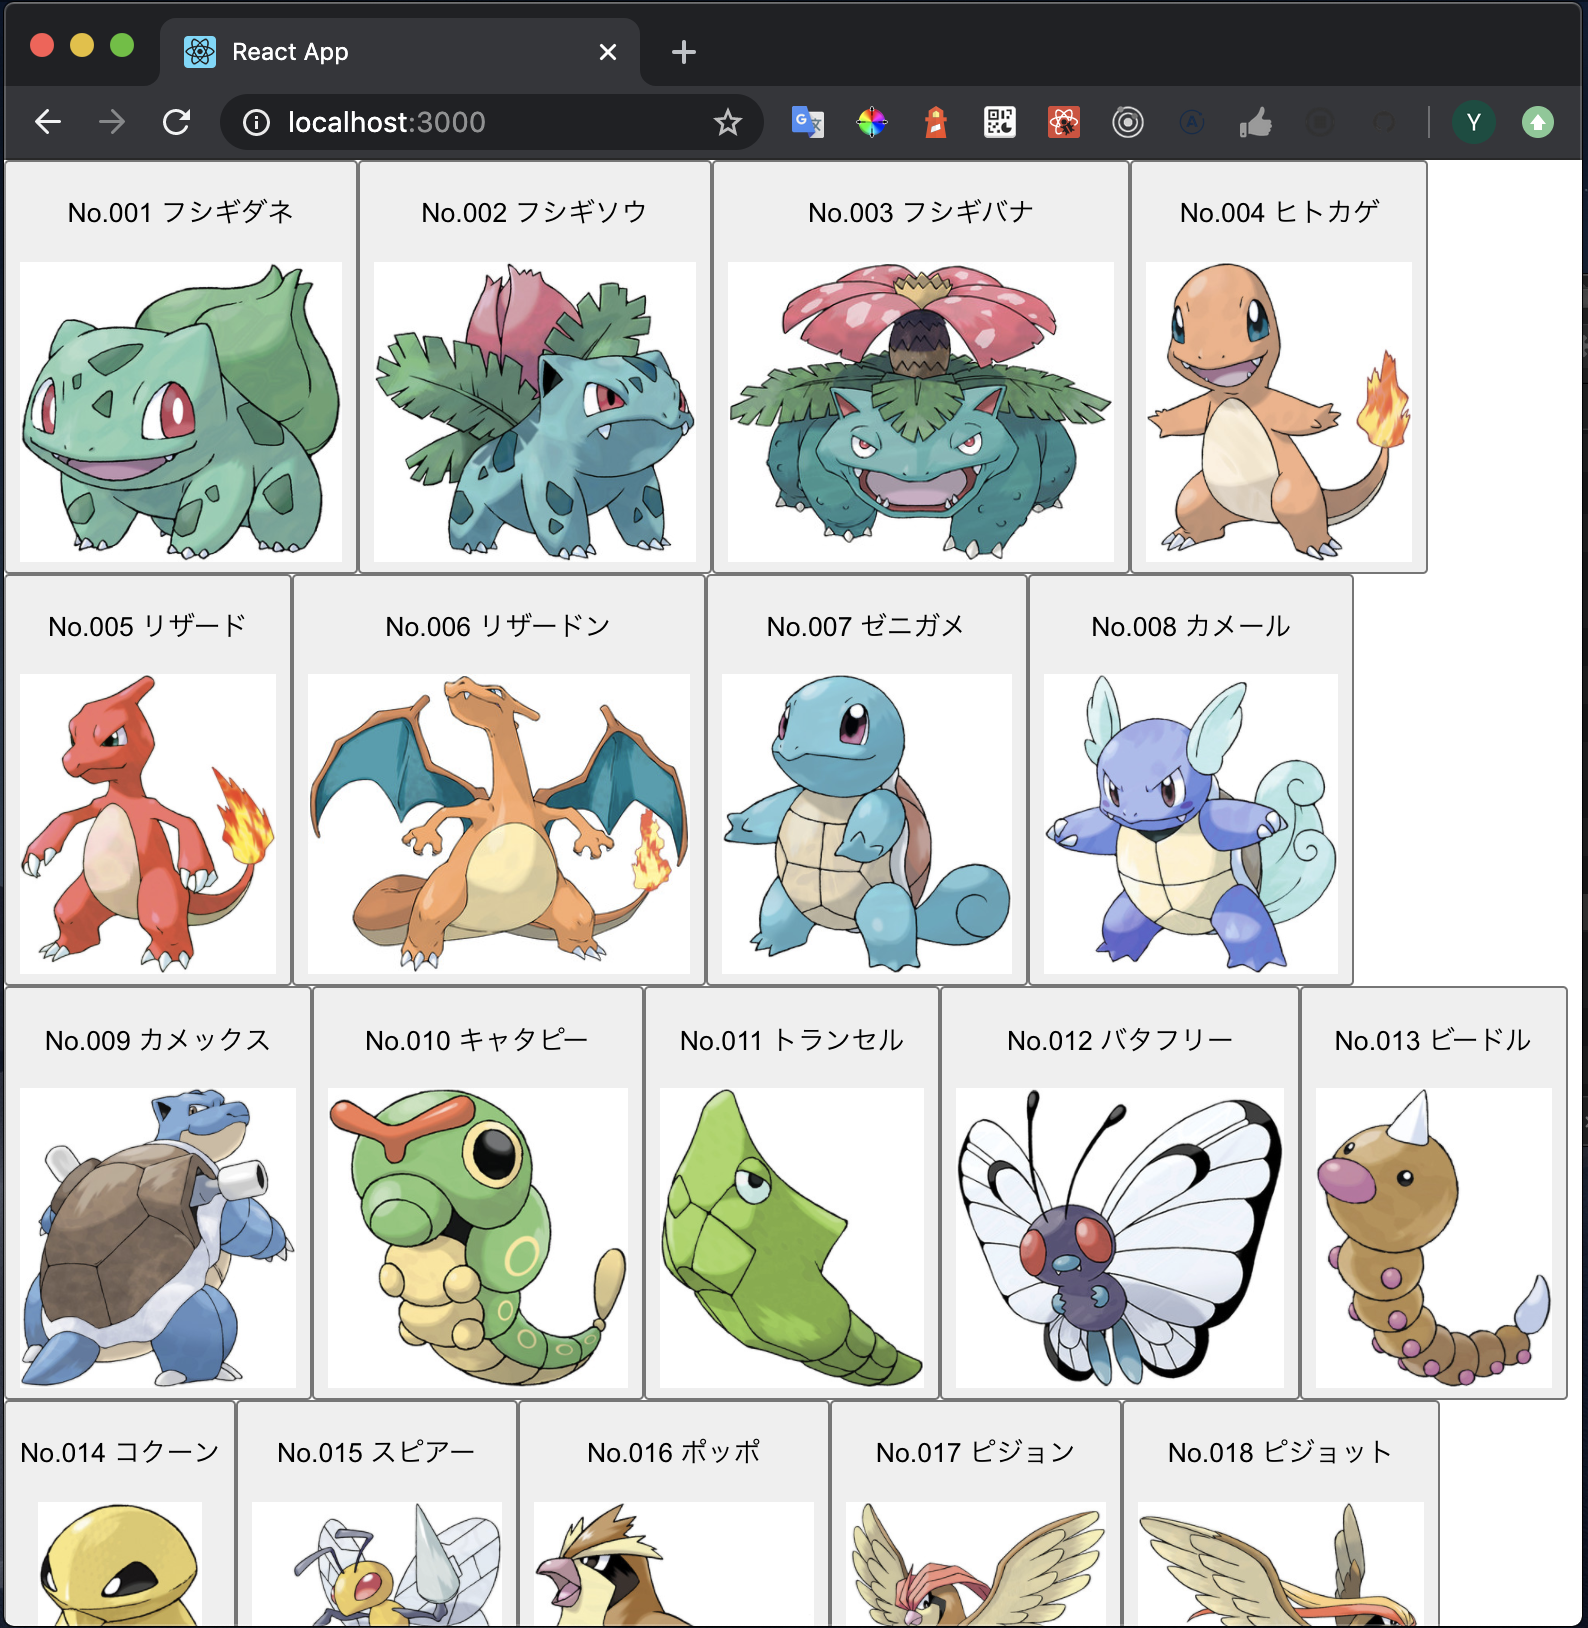
# 一覧画面を作成する
- ポケモンを一覧で表示する画面を作ってみましょう
- 以下参考実装を記載しますができる人は自力でやってみましょう!
# ヒント
- 作成/修正するファイル
src/graphql/schema.js- ポケモン一覧を取得するQueryを定義する
src/components/PokemonList.js- ポケモン一覧を表示するコンポーネント
useQueryを使ってサーバからデータを取得する
src/routes/router.jsPokemonListを表示するルーティングの設定を追加する
# サンプル実装
src/graphql/schema.js
import { gql } from '@apollo/client';

export const GET_ALL_POKEMON = gql`
  query Pokemons {
    pokemons(first: 151) {
      id
      name
      image
    }
  }
`;
1
2
3
4
5
6
7
8
9
10
11
2
3
4
5
6
7
8
9
10
11
src/components/PokemonList.js
import React from 'react';
import { useQuery } from '@apollo/client';

import { GET_ALL_POKEMON } from '../graphql/schema';

function PokemonList() {
  const { loading, error, data } = useQuery(GET_ALL_POKEMON);
  console.log({ loading, error, data });

  if (loading) return 'Loading...';
  if (error) return `Error! ${error.message}`;

  return data.pokemons.map(({ id, name, image }) => (
    <button key={id}>
      <p>
        No.{id} {name}
      </p>
      <img src={image} alt={name} height="150" />
    </button>
  ));
}

export default PokemonList;
1
2
3
4
5
6
7
8
9
10
11
12
13
14
15
16
17
18
19
20
21
22
23
2
3
4
5
6
7
8
9
10
11
12
13
14
15
16
17
18
19
20
21
22
23
src/routes/router.js
import React from 'react';
import { BrowserRouter, Route } from 'react-router-dom';
import PokemonList from '../components/PokemonList';

function Router() {
  return (
    <BrowserRouter>
      <div>
        <Route path="/" exact>
          <PokemonList />
        </Route>
        <Route path="/pokemons" exact>
          <PokemonList />
        </Route>
      </div>
    </BrowserRouter>
  );
}

export default Router;
1
2
3
4
5
6
7
8
9
10
11
12
13
14
15
16
17
18
19
20
2
3
4
5
6
7
8
9
10
11
12
13
14
15
16
17
18
19
20
- サンプルの完成形
# 詳細画面を作ってみる
- ポケモンの詳細情報を表示する画面を作ってみましょう
- 以下参考実装を記載しますができる人は自力でやってみましょう!
# ヒント
- 作成/修正するファイル
src/graphql/schema.js- 個別のポケモンを取得するQueryを追加する
src/components/PokemonDetail.js- ポケモン詳細を表示するコンポーネント
- ReactRouterの
useParamsを使うとURLのIDを取得できる useQueryでIDを指定してサーバから特定のポケモンデータを取得する
src/components/PokemonList.js- 一覧画面でポケモンを選択すると詳細画面に繊維するようにする
- ReactRouterの
useHistoryを使う
src/routes/router.jsPokemonDetailを表示するルーティングの設定を追加する- URLにポケモンのNo.を入れるようにするとよい
# サンプル実装
src/graphql/schema.js
import { gql } from '@apollo/client';

export const GET_ALL_POKEMON = gql`
  query Pokemons {
    pokemons(first: 151) {
      id
      name
      image
    }
  }
`;

export const GET_POKEMON_BY_ID = gql`
  query Pokemon($id: String!) {
    pokemon(id: $id) {
      id
      name
      classification
      types
      height {
        minimum
        maximum
      }
      weight {
        minimum
        maximum
      }
      evolutions {
        id
        name
      }
      image
    }
  }
`;
1
2
3
4
5
6
7
8
9
10
11
12
13
14
15
16
17
18
19
20
21
22
23
24
25
26
27
28
29
30
31
32
33
34
35
2
3
4
5
6
7
8
9
10
11
12
13
14
15
16
17
18
19
20
21
22
23
24
25
26
27
28
29
30
31
32
33
34
35
src/components/PokemonDetail.js
import React from 'react';
import { useQuery } from '@apollo/client';

import { GET_POKEMON_BY_ID } from '../graphql/schema';
import { useParams, Link } from 'react-router-dom';

function PokemonDetail() {
  // URLのIDを取得する
  const { id } = useParams();
  // Queryを実行する
  // 引数はvariablesに指定する
  const { loading, error, data } = useQuery(GET_POKEMON_BY_ID, {
    variables: { id },
  });
  console.log({ loading, error, data });

  if (loading) return 'Loading...';
  if (error) return `Error! ${error.message}`;

  return (
    <div>
      <dl>
        <dt>No.</dt>
        <dd>{data.pokemon.id}</dd>
        <dt>名前</dt>
        <dd>{data.pokemon.name}</dd>
        <dt>種別</dt>
        <dd>{data.pokemon.classification}</dd>
        <dt>タイプ</dt>
        <dd>{data.pokemon.types}</dd>
        <dt>全長</dt>
        <dd>
          {data.pokemon.height.minimum}〜{data.pokemon.height.maximum}
        </dd>
        <dt>重量</dt>
        <dd>
          {data.pokemon.weight.minimum}〜{data.pokemon.weight.maximum}
        </dd>
        <dt>進化</dt>
        <dd>
          {data.pokemon.evolutions
            ? data.pokemon.evolutions.map(poke => (
                <>
                  <Link to={`/pokemons/${poke.id}`} key={poke.id}>
                    {poke.name}
                  </Link>
                  <br />
                </>
              ))
            : 'なし'}
        </dd>
      </dl>
      <img src={data.pokemon.image} alt={data.pokemon.name} height="300" />
    </div>
  );
}

export default PokemonDetail;
1
2
3
4
5
6
7
8
9
10
11
12
13
14
15
16
17
18
19
20
21
22
23
24
25
26
27
28
29
30
31
32
33
34
35
36
37
38
39
40
41
42
43
44
45
46
47
48
49
50
51
52
53
54
55
56
57
58
2
3
4
5
6
7
8
9
10
11
12
13
14
15
16
17
18
19
20
21
22
23
24
25
26
27
28
29
30
31
32
33
34
35
36
37
38
39
40
41
42
43
44
45
46
47
48
49
50
51
52
53
54
55
56
57
58
src/components/PokemonList.js- クリック時の処理を追加
import React from 'react';
import { useQuery } from '@apollo/client';
// useHistoryのimportを追加
import { useHistory } from 'react-router-dom';

import { GET_ALL_POKEMON } from '../graphql/schema';

function PokemonList() {
  // ページ遷移などを実行できるhistoryを取得
  const history = useHistory();
  const { loading, error, data } = useQuery(GET_ALL_POKEMON);
  console.log({ loading, error, data });

  if (loading) return 'Loading...';
  if (error) return `Error! ${error.message}`;

  return data.pokemons.map(({ id, name, image }) => (
    //クリックしたら詳細ページに遷移する処理を追加
    <button key={id} onClick={() => history.push(`/pokemons/${id}`)}>
      <p>
        No.{id} {name}
      </p>
      <img src={image} alt={name} height="150" />
    </button>
  ));
}

export default PokemonList;
1
2
3
4
5
6
7
8
9
10
11
12
13
14
15
16
17
18
19
20
21
22
23
24
25
26
27
28
2
3
4
5
6
7
8
9
10
11
12
13
14
15
16
17
18
19
20
21
22
23
24
25
26
27
28
src/routes/router.js
import React from 'react';
import { BrowserRouter, Route } from 'react-router-dom';
import PokemonList from '../components/PokemonList';
// コンポーネントのimportを追加
import PokemonDetail from '../components/PokemonDetail';

function Router() {
  return (
    <BrowserRouter>
      <div>
        <Route path="/" exact>
          <PokemonList />
        </Route>
        <Route path="/pokemons" exact>
          <PokemonList />
        </Route>
        {/* 詳細ページの設定を追加 */}
        <Route path="/pokemons/:id" exact>
          <PokemonDetail />
        </Route>
      </div>
    </BrowserRouter>
  );
}

export default Router;
1
2
3
4
5
6
7
8
9
10
11
12
13
14
15
16
17
18
19
20
21
22
23
24
25
26
2
3
4
5
6
7
8
9
10
11
12
13
14
15
16
17
18
19
20
21
22
23
24
25
26
- サンプルの完成形
